

welcome
Welcome to the Made Just Sew Quilted Christmas Star Stocking Workshop — an online course designed to guide you through every step. Whether you’re brand new to quilting or simply sewing along for fun, we’ve got you covered!

Quilting 101
Before we start, there is a little bit of Quilting lingo to get our heads around! Please feel free to skip ahead if you're already fluent in the language of quilting!
Backing - This is the 'back' of the quilt, often made from a single solid piece of fabric.
Wadding/Batting - the fluffy layer in the middle of your quilt sandwich (see below for what a quilt sandwich is!) It comes in many different forms and can be made from cotton, polyester or wool - or a combination of the 3!
Blocks - a piece of fabric made from sewing fabric together (as in the 'Star Blocks' for this workshop)
Piecing - sewing together pieces of fabric to make the top part of the quilt sandwich.
Quilt sandwich - the three layers make up a quilt (and the difference between a quilt and a blanket!!!) The three layers are: backing, wadding and quilt top.
Quilt top - The top fabric of the quilt sandwich, which has been 'pieced' together. Sometimes also referred to as the 'patchwork top'.
Quilting - the process of sewing through the 3 layers of the quilt sandwich. This can be done by machine or by hand, and there are many different designs and ways to 'quilt'.
Seam allowance - the standard seam allowance for quilting is 1/4 inch.
Pressing seams open - using an iron and pressing down on the open seams, securing them open.
right sides together - placing fabric on top of each other with the printed side of the fabric facing in, touching each other.

Half-square-triangles (HSTs) - a small square block made up of 2 triangles
Flying geese (FGs) - a rectangular block with 2 triangles at each end
Quarter-square-triangles (QSTs) - a square block made up of 4 triangles.
Walking foot - a sewing machine foot, specifically designed to help 'walk' thicker fabric through the sewing machine. It is therefore recommended to be used for quilting your quilts.
1/4" foot - a sewing machine foot used to produce 1/4" seams.


Module 1: how to get started

1.1 Equipement and Tools
I have listed below the equipment and tools that you will need and a few items I recommend you use but are not essential. Click each listing to shop the item!
The list of things you will definitely need:
Sewing machine - you can make these stockings on ANY sewing machine, you don't need anything fancy!
Fabric - (see the next section for how to chose your fabric)
Quilting ruler (6' x 24' will cover everything!)
Thread of choice
Iron
List of things I recommend but are not essential:
Walking foot (check with your brand of sewing machine)
List of things you really don't need, but I LOVE to use:
1.2 Picking Fabric
In this video I will run through what fabric you will need to make the Stockings and a few tips and tricks on how to choose them.
All the fabric requirements can be found on page 3 of the pattern.
There is also a digital colouring-in page at Pre Quilt to help colour-in and choose your fabric for your stars here: https://app.prequilt.com/market/mjs/starstocking There is a bonus video on how to use Pre-Quilt at the end of this course.
1.3 Prepping Fabric
If you are completely new to quilting and think I am talking a totally different language when I talk about rotary cutters and quilting rulers - then check out this video!
I run through how to prepare your fabric for cutting and how to cut your fabric with a rotary cutter and quilting ruler.
Module 2 - Making The Stocking Front
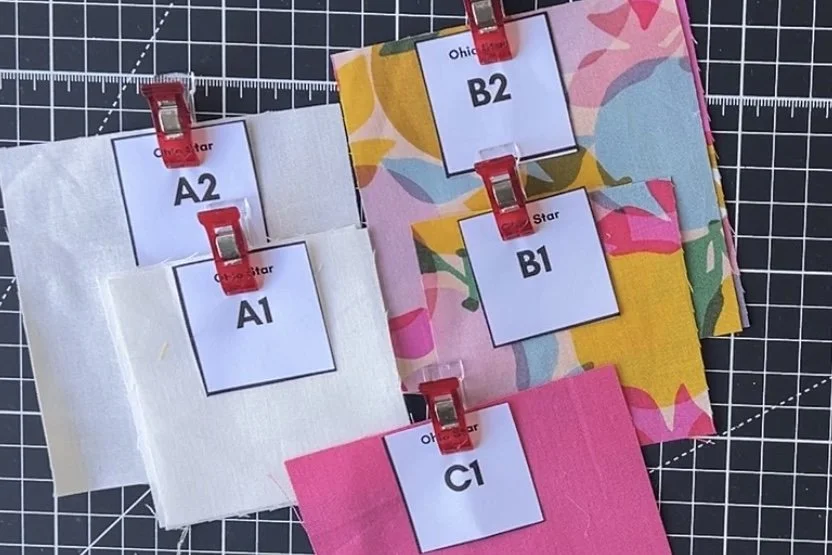
2.1 Stocking Labels
A handy tip! - print these labels to keep your cut fabric organised. Pin each label to the corresponding fabric piece to make things a little easier along the way!
2.2 Making the Ohio Star Block
What you will need to make the Ohio Star Block:
Fabric A1, A2, B1, B2 and C1 for the Ohio Star
Sewing machine
Iron
These steps can also be followed on page 6 of the pattern;
STEP ONE:
Stack fabric A2 with B2. (Fig 1)
Draw a diagonal line across.
Sew a ¼″ seam either side of the diagonal.
Cut along the diagonal line to produce 2 HSTs.
Press open seams.
Repeat these steps for fabric B2 with C1. (Fig 2)

STEP TWO:
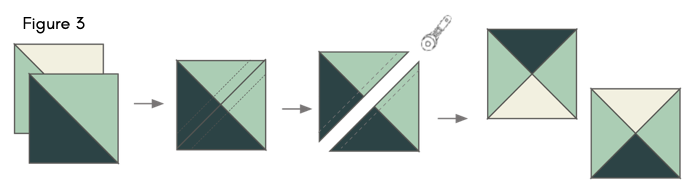
Take one of the HST A2/B2 combinations and place RST with one of the B2/C1 HST combinations. (Fig 3)
Draw a line diagonally across the top, opposite to the diagonal on the two-at-a-time HST.
Sew a ¼″ seam either side of the diagonal.
Cut along the diagonal line.
Press open seams and trim to 3″, taking care to centre the 2-at-a-time HST point.
Repeat these steps to make 4 QSTs.
STEP THREE:
Lay out the pieces for the block. (Fig 4)
Sew the rows together and press open the seams. (Fig 5)
Sew these rows together and press open the seams. (Fig 6)
Finished block size is 8″

2.3 Making the Sawtooth Star Block
MAKING SAWTOOTH STAR BLOCK:
What you will need to make the Sawtooth Star Block:
Fabric A1, B1, B2 and C1
Sewing machine
Iron
MAKING FLYING GEESE:
Place (2) C1 squares on opposite corners of a B2 square RST. (Fig 1)
The C1 squares will overlap slightly forming a small square (Fig 1)
On the wrong side of the squares, draw a diagonal line from corner to corner. (Fig 2)
Pin the two squares in place (if desired) and sew ¼″ seam on each side of the marked line. (Fig 2)
Cut along the diagonal drawn line (Fig 3) to make (2) (Fig 4).
Press the seams to the one-side towards the small squares. (Fig 4)

Place (1) C1 square in the corner of each unit RST. (Fig 5)
Draw a diagonal line from corner to corner of C1. (Fig 6)
Pin the square in place (if desired) and sew ¼″ seam on each side of the marked line. (Fig 6)
Cut along the diagonal drawn line. (Fig 7)
Press the seams to the one-side towards the small squares. (Fig 8)
Trim the blocks to 2½″ x 4½″.

CONSTRUCTING THE SAWTOOTH BLOCK:
Lay out the pieces for the block. (Fig 9)
Sew the rows together and press open the seams. (Fig 10)
Sew these rows together and press open the seams. (Fig 11)
Finished block size is 8½″

2.4 Making the Hunters Star Block
What you will need to make the Hunter's Star Block:
fabric A1, A2, B1 and C1
Sewing machine
Iron
MAKING HSTs 4-AT-A-TIME (Fig 1-3)
Place the two fabrics RST.
Draw a line across both diagonals.
Sew a ¼″ seam around the entire edge.
Cut along the diagonal lines.
Press open seams and trim to 2½″.
CONSTRUCTING THE HUNTERS BLOCK
Lay out the pieces for the block. (Fig 4)
Sew the rows together and press open the seams. (Fig 5)
Sew these rows together and press open the seams. (Fig 6)
Finished block size is 8″
2.5 Making the front of the Stocking
Now that we have made our Star Blocks, it is time to add them to front sections of the stocking.
Follow along on page 7 of the pattern and watch the video to see how the front of the stocking comes together.
Step 1
Take front fabric piece B and C and place them right-side-down on top of the star block aligning them along opposite sides.
Sew ¼″ seam allowance. Press open seams. Trim the bottom and top in line with the star block(Fig 1)
Take fabric A and sew to the top, press open seams. (Fig 1)
Take fabric D and sew to the bottom, press open seams. (Fig 1)
Now you have the front fabric for the stocking. (Fig 2)

You are now ready to move to the next section and get ready to baste your stocking front ready to quilt it!
Module 3 - Quilting!
3.1 Intro into Walking Foot Quilting
In Module 3, we will cover 3 different ways to quilt the front of our stocking;
Parallel lines
A detailed design
Quilting just the Star
We will quilt each of these designs using a Walking Foot on our sewing machine. This foot helps to feed the top of the quilt sandwich through the sewing machine the same time as the bottom (backing) of the quilt sandwich.
If you want to learn more about Walking Foot designs I highly recommend the 'Walk' and Walk 2.0' books by Jacquie Gering.
Thread;
The thread I used on all of the stockings is Aurifil 50wt. You can shop all Aurifil threads here! I love how Aurifil thread looks on a quilted project and wouldn't use anything else!
Setting up your sewing machine to quilt the stockings;
I have the same weight thread in my bobbin as in my top thread - this does not have to be the same colour, but the same weight will prevent tension problems on your sewing machine.
I set my stitch length to 2.8 (you can longer if you are quilting a bigger project - but this is perfect for the stockings)
I make sure my walking foot is attached and then we are all set to start quilting!
3.2 Basting
I am a 'spray baste' quilter! Which means I like to use a spray to stick my quilt sandwich layers together! I always use Odif 505 adhesive spray for my quilting projects.
If you would prefer to pin your project then pin away! I won't be covering this method in this section, so feel free to skip ahead!
How to baste your stocking front ready to quilt;
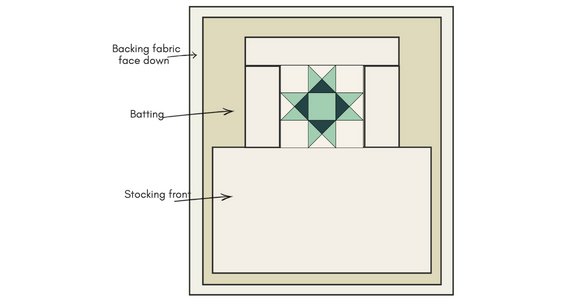
Lay out your backing (for quilting - NOT the stocking backing), then the wadding and then the stocking front. This is your quilt sandwich! (Fig 1)
Peel back half of the wadding and stocking front to expose half of the backing and spray lightly with the Odif 505 basting spray.
Carefully peel the layers back down
Next peel half of the stocking front back, spray the exposed wadding and peel it back down.
Repeat these steps for the other half of the sandwich.
Gently iron your 'stocking sandwich' which will activate the glue remove Andy puckers and secure everything is stuck well together.
Figure 1;
3.3 Stocking Template
Watch the quick video above to see how I make the stocking template from the last 4 pages of the pattern. Alternatively, follow the steps below;
Print out the stocking template at the back of the pattern.
Cut out the stocking template.
Align the pieces of the stocking together so the dotted lines line up on top of each other and secure with tape.
Cut out the stocking template.
3.4 Quilting Parallel Lines
A quick but really effective quilting technique. One of my all time favourites as it is quick and only requires to draw one line! Enjoy!
Quilting Parallel Lines:
Draw the stocking template outline, so you can see where you will need the quilting to start and finish.
Draw or mark a line through the middle of the star block, parallel to the bottom seam of the block.
Using your walking foot on your sewing machine, sew directly across this line, making sure to go over the edge of the template outline.
Go back to the same start point as the first sewn line and line up your walking foot so the right hand side of the foot is flush with the sewn line.
Sew another line across the stocking.
Repeat these steps to the end of the stocking.
Turn the stocking and repeat these steps to the top of the stocking.
Cutting out th Stocking Front
Using a rotary cutter, carefully follow the drawn template line and cut out the front of your stocking.
Lastly, remove any pen marks with a hot iron.
3.5 Detailed Quilting Design
This quilting design may look complicated, but when it is broken down it is more simple than it looks! It may take a little longer to complete, but the finish effect is stunning and these stockings will definitely star out at Christmas!
I recommend you watch the video for this design as it will easier to follow along and pause and rewind the video as when you need to.
Detailed quilting design:
Draw the stocking template outline, so you can see where you will need the quilting to start and finish.
Draw or mark a line through the middle of the star block, parallel to lines of the star block (see 11sec on video)
Draw or mark parallel lines 1 1/2" from this first drawn line across the whole stocking front.
Take the stocking front to the sewing machine and sew directly on these drawn lines.
Next draw or mark a line through the centre of the star block in the opposite direction. (see 2.08min on video)
Draw or mark parallel lines 1 1/2" from this drawn line across the whole stocking front.
Take the stocking front to the sewing machine and sew directly on these drawn lines.
Now sew through the centre of each 'diamond'. You do not need to mark these lines, you should be able to easily 'eye ball' where to sew. (see 4.20min on video)
On the new sewn lines, mark 1/2" from each point of the all the diamonds. (see 5.47min on video)
Sew a 'zig-zag' from each diamond point to the new drawn dots across the whole stocking front. (see 7.02min on video)
Cutting out th Stocking Front
Using a rotary cutter, carefully follow the drawn template line and cut out the front of your stocking.
Lastly, remove any pen marks with a hot iron.
3.6 Quilting Just The Star
Sometimes less is more and that can not be more true for this quilting design. We start by quilting thin parallel lines within the star block with a coloured thread and finish it with sewing around the star block. The rest of the stocking is left alone. This makes the detail of the quilting on the star pop out and shine!
Quilting Just the Star:
Mark every 1/4" across the bottom of one of the star points. (see 1.15min on the video)
Mark every 1/4" across the top of the same star points.
Join up the marked points with an erasable fabric pen.
Repeat this for all 4 matching star points.
Sew along each of the drawn lines, leaving your threads long at the start and end of each line.
Once you have quilted all the lines, pull the top threads to the back. (see 4.35mins on the video)
Mark 1/8th around the whole star with an erasable fabric pen.
Choose a thread colour of your choice and sew directly on this line.
Cutting out the Stocking Front
Using a rotary cutter, carefully follow the drawn template line and cut out the front of your stocking.
Lastly, remove any pen marks with a hot iron.
Module 4 - Finishing touches
4.1 Making the Loop
Making the Loop!
Fold the loop fabric in half along the long edge, press and open out.
Fold the long edges into the centre fold and press again.
Fold along the original fold line and press again.
Sew a straight line, ¼″ allowance along the open folded edge.
If you intend to make a lot of stockings and want to save yourself a little bit of time, then you can use an alternative such as this faux leather string. It is really affordable and strong and looks good!
4.2 Finishing the Stocking
You are so close to the finishing line! Are you excited?
Now take care with this section that you line up all your stocking pieces the right way. Bu do not fear if you should make a mistake and sew something the wrong way round - unpick and try again!
Finishing your stocking;
Take your lining fabric, draw around the stocking template one way, then flip the template so it is the mirror image and draw around the template.
Cut out the 2 lining pieces and put to one side.
Place the backing fabric right-side-down.
Draw around the template with the toe facing right and cut out.
What you should now have ready to sew together to make your stocking:
Bonus!
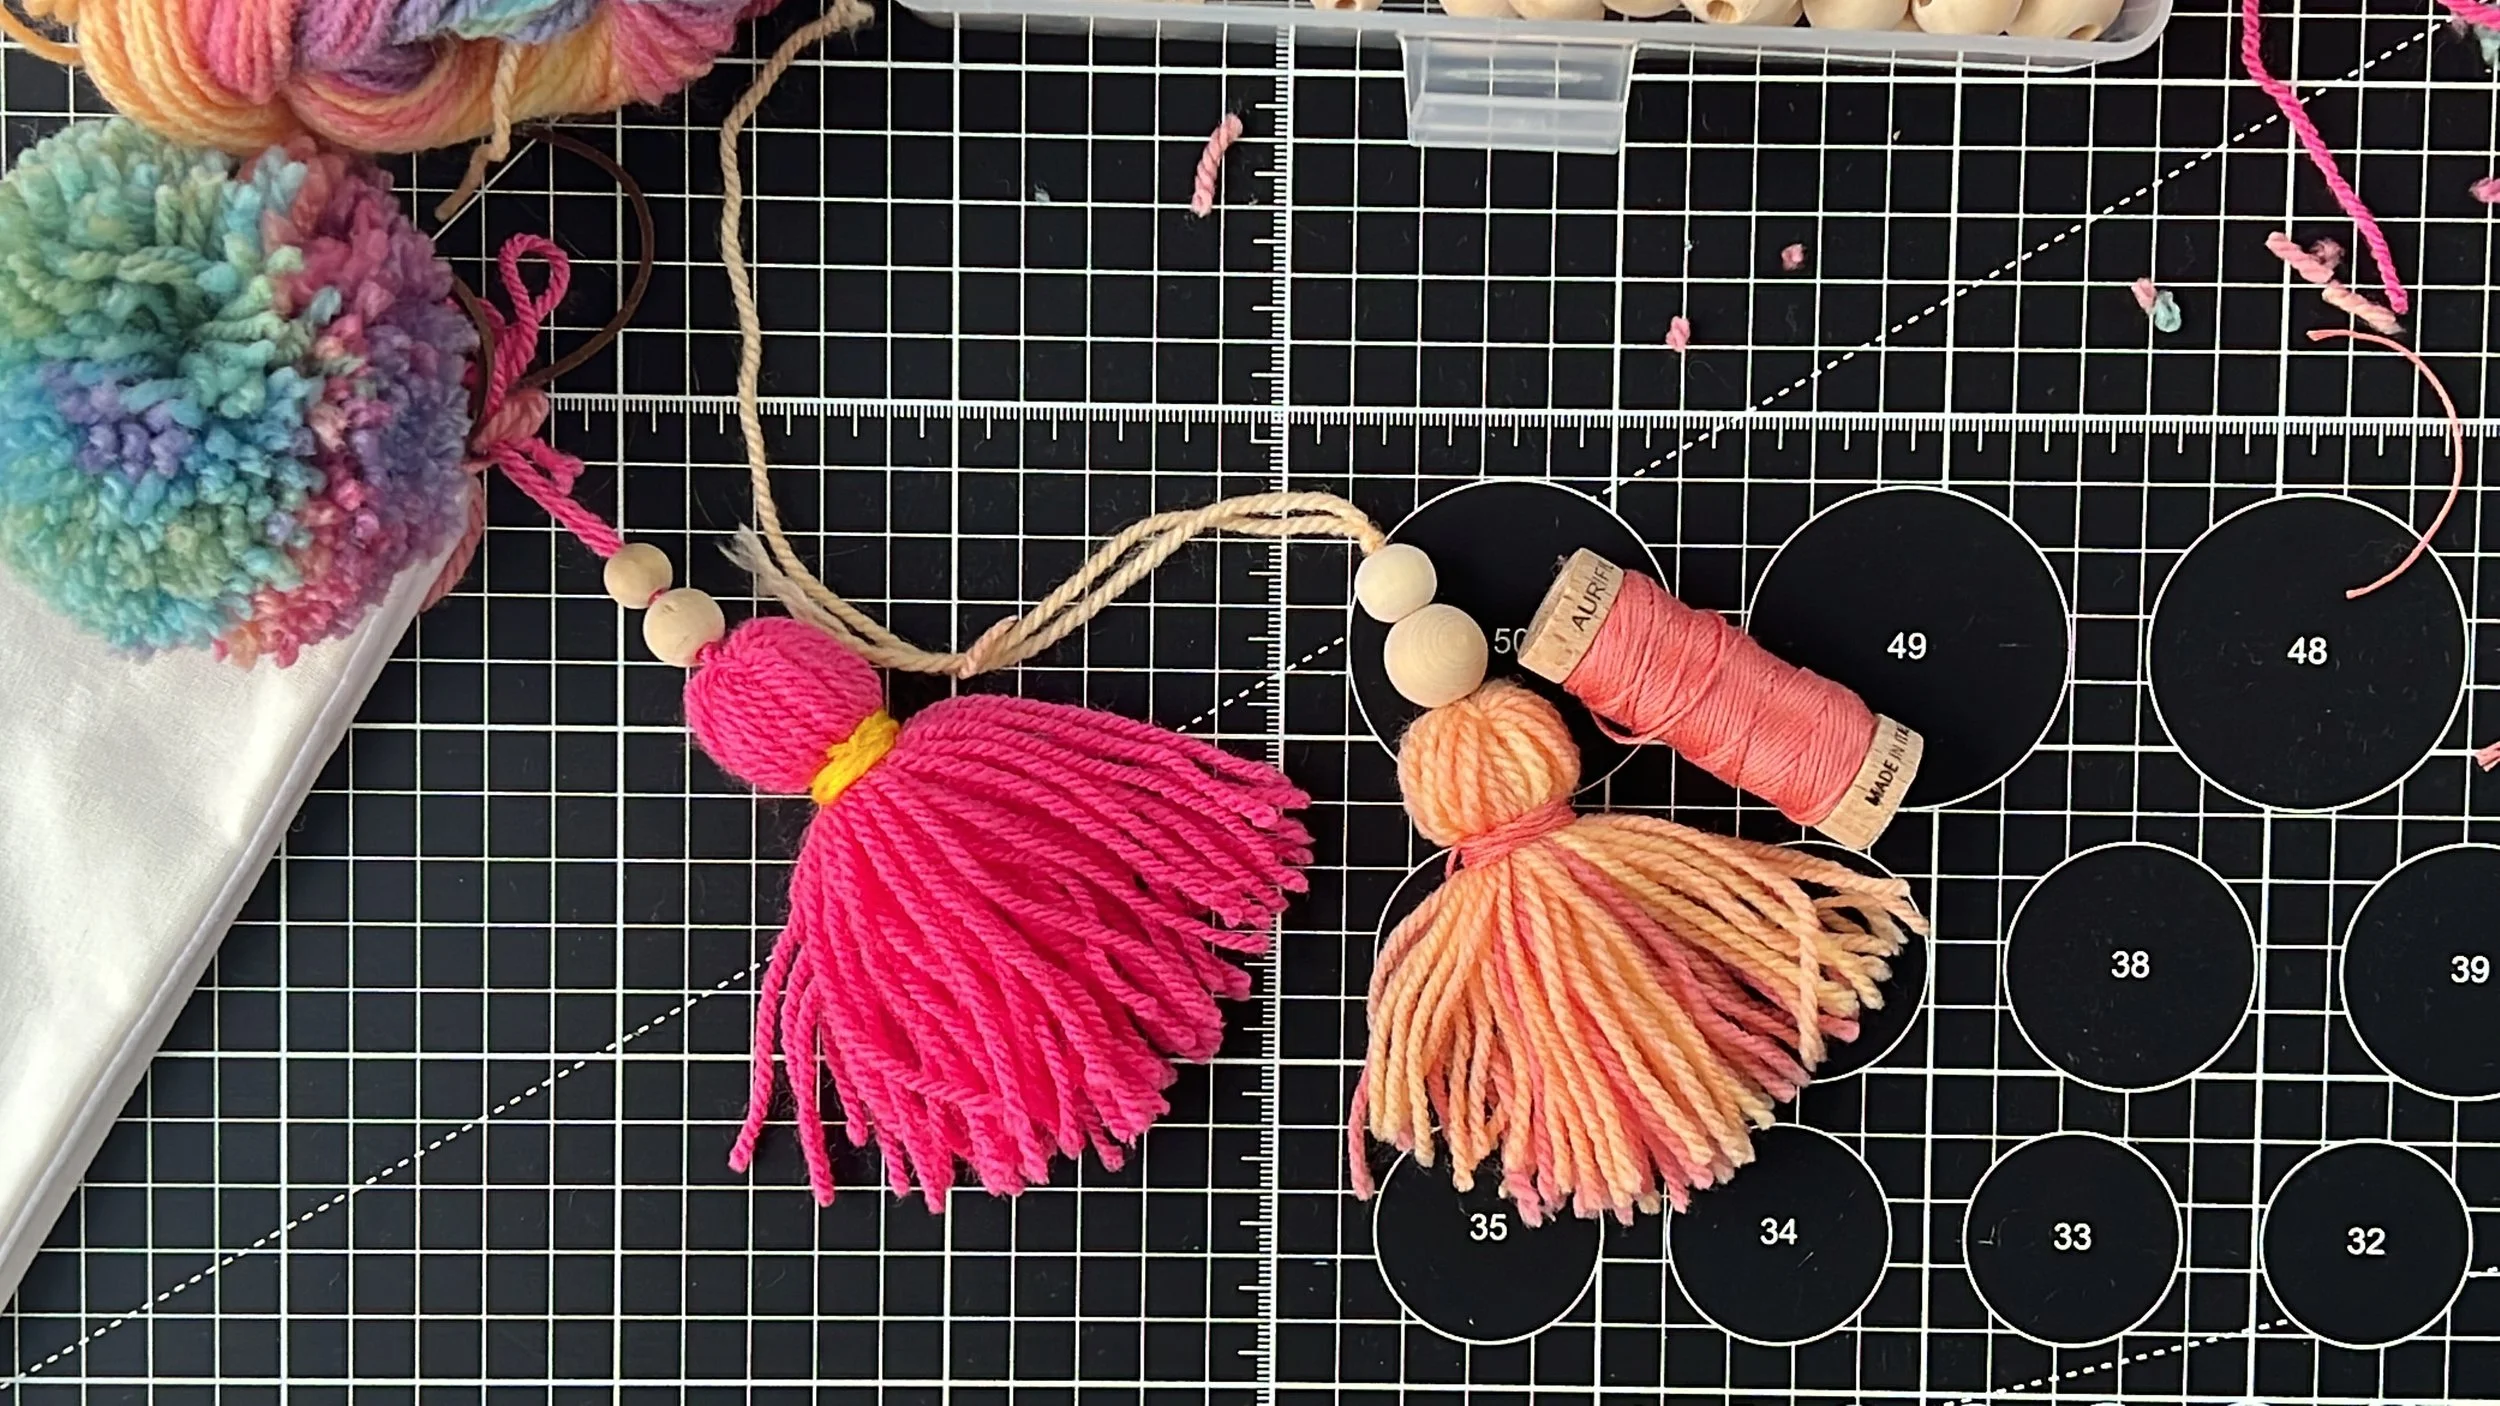
Making Pom Poms!
Shake Your Pom Poms! Who doesn't love a Pom Pom on a stocking! Watch the quick video above to see how it's done.
I couldn't finish this workshop without running through how I make my Pom Poms! I like to use the Clover Pom Pom makers which I bought in a set of 4, so it is easy to make a range of sizes. They are lovely and straight forward to use.
I am no wool expert but have found that Merino wool make the best 'fluffy' Pom Poms - but can shed fluff all over your stockings so my new favourite it a rainbow acrylic like this one - which gives a lovely multi-tonal effect.
But wait!........ there is more......check out the next video to find out how to make Tassels to compliment your Pom Poms!
Making Tassel Pom Poms!
Tassels and Pom Poms - it really is the dream team! Watch the quick video above to see how it is done.
These tassels are really straight forward to make. To finish them off I used some Aurifil Floss and some wooden craft beads to add a little detail to the top!

Pre Quilt Digital Colouring-in Page
As an extra bonus, I have made a video running through how to use Pre-Quilt to 'colour-in' your stars and help you decide on your fabric selection!