
Spruce Block - Quiltmas Spectacular 2021

Quiltmas Spectacular 2021 is here! And I am so excited to finally share my Spruce Block I designed for day 8!
New to the Quiltmas Spectacular? It is a fun packed festive sew-along where 12 very talented quilt designers all design and share a Xmas themed block for FREE over the first 12 days of Christmas (1st Dec- 12th Dec).
To receive the blocks you need to be sign up to the mailing list. The blocks will be emailed to you daily.
Haven’t signed up yet and missed the first few days? - DO NOT WORRY, once you have signed up you will receive a welcome email with a link to ALL of the previous blocks of the 2021 Quiltmas Spectacular.
BUT - you only have until the 31st to sign up and receive he blocks, so don’t delay, sign up today and download them to your computer so you have them to make at your own pace!
Let me introduce you to Spruce!

Fabrics used for my cover Spruce Block are all from Art Gallery Fabrics Cozy & Magical Collection; Deck the Halls, Christmastde Town, Raw Gold and Pacific.
So the name Spruce reminded me of Bruce, which reminded me of ‘Yippee Ki Yay’ and if you know what I’m talking about, then you are my people! For those of you probably a lot younger than myself, it’s a line from Die Hard, which in my eyes ‘IS’ a Xmas movie but its a very controversial opinion as many would disagree, but I spent the 90’s watching this on repeat over Xmas with my brother, so it always reminds me of Xmas!
So Spruce it is! He’s a super clever block that comes together quickly with the cutest mini-star sparkling on top! The design came about after I was playing around with shapes. Earlier this year I released my Collider Quilt pattern, which used Half-Rectangle-Triangles (HRTs). I want you all NOT to be scared of the HRT. The method I use in this pattern is my preferred method and it is so easy once you know how!
Fabric
The fabrics used for my cover Spruce Block are all from Art Gallery Fabrics Cozy & Magical Collection;
Lets go over making the Mini-Star!

Following the instructions of page three of the Spruce Block Pattern. Making the points for the Mini-Star sub-block looks tricky, but it is a really easy technique that makes the perfect points! Use these photos along with the pattern instructions on page 3 and 4 to help you;

Line 4 marked B7 squares on the marled line on the A1 strip and sew along the line.

Once sewn, cut in-between each one.

Finger press A1 back as shown.

Trim the top of the A1 as shown. This will help in the next step!

Sew along the marked line on the 2nd A1 strip.

Cut between each one.

Press the A1 section out, leaving the B7 square intact (do not trim the B7 square!)

Trim a round the B7 Square to produce the Mini-Star points!
The main Tree and HRTs!
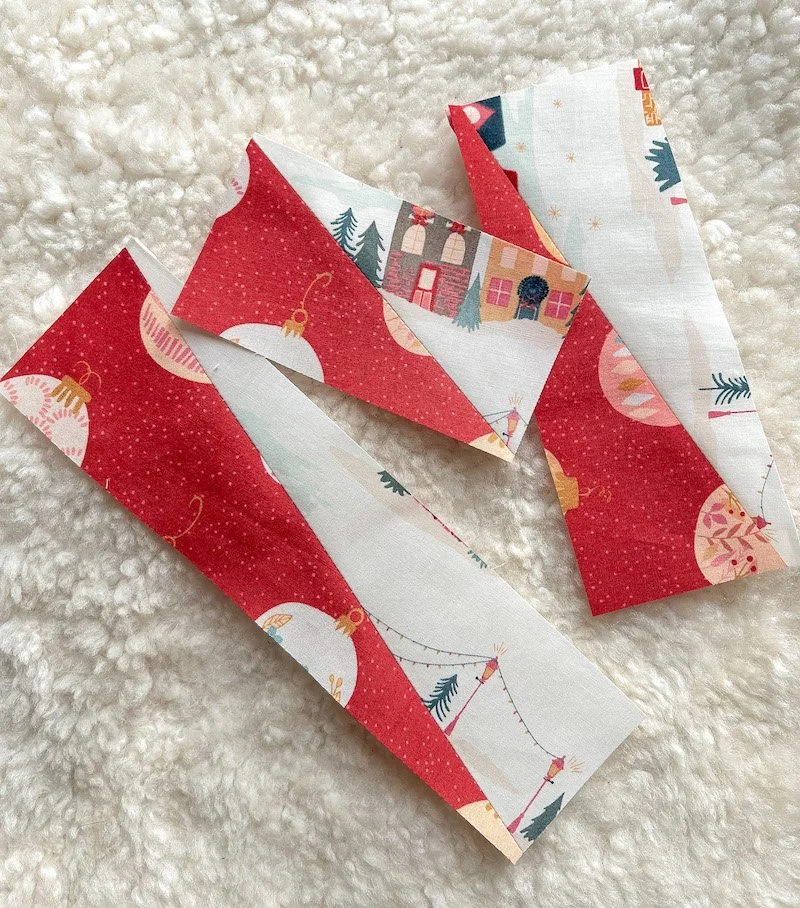
If I manage to convert one person into loving HRTs I will be so happy! They really are not scary at all and I think they just have a bad reputation! The method I use makes 2-at-a-time - you will only need ONE of these two (and please take note of which one if using directional print fabric as noted in the pattern!). There is a method to make one-at-a-time, but I find it really fiddly and harder to make, so I went with my gut and used the 2-at-a-time method!
These HRTs in this pattern are long and skinny - which means when you trim the blocks to size, the quilting ruler will be at ‘funny’ angle and will feel like you’re doing something wrong - but trust me, they will turn out just fine!
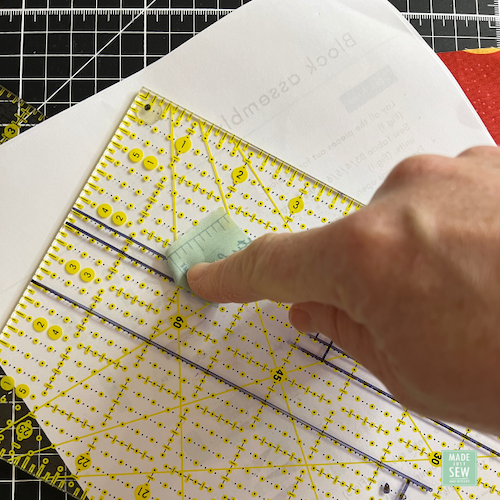
The main thing to get right with HRTs is the trimming! Get your Sharpie pens ready guys - I’m going to walk you through how to trim them perfectly! Following the Spruce Block Pattern from page 7, here is how we do it;

Take your Share Pen and mark your quilting ruler at eh 2 insertion points listed in the pattern on Page 7 (red arrows show the points marked).

If you want, you can even draw the finished size of the HRT block as shown here!

Line up the insertion point dot ON THE seam line (red arrows). The ruler will feel at a strange angle - but make sure the finished block size covers the whole of the fabric (you can see here that the black outline of the finished block size covers the fabric).

Trim the right side and top with a rotary cutter.

Turn the HRT 180 degrees, line the finished block size up with the bottom and left side and the insertion points on the seam line. Trim the right side and top with a rotary cutter.

Ta Da - you did it! Finished HRT!

To remove the Sharpie Pen marks, use nail polish remover and a scrap piece of fabric.
A few drops of nail polis remover on the scrap fabric and run the marks off! Good as new!
Share Your Spruce Blocks!
I hope you all enjoy making your Spruce Blocks! I would love to see them, so remember to tag #madejustsewpatterns #quiltmasspectacular and #sprucequiltblock over on Instagram.

The Quiltmas Elves who helped me test my pattern and their finished versions! @runningstitchquilts and @porcupinesew_threads. All made with fabrics from Art Gallery Cozy and Magical Collection.

